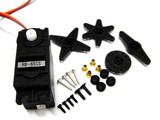
- Control System: +Pulse Width Control 1500usec Neutral
- Operating Voltage: 4.8-6.0 Volts
- Operating Temperature Range: 0 to +60 Degree
- Operating Speed (4.8V): 0.14sec/60° at no load
- Operating Speed (6.0V): 0.12sec/60° at no load
- Stall Torque:(4.8V): 6kg·cm ;(6.0V): 6.5kg·cm
- Dead Band Width: 10usec
- Connector Wire Length: 300mm
- Dimensions: 40.8mm X 20.1mm X 38mm
- Weight: 40g
- Location of each pin: red (+),brown (-), yellow (signal)

int servopin=7;//Define servo PWM control as digital 7
int myangle;//define variable angle
int pulsewidth;//define variable pulse width
int val;
void servopulse(int servopin,int myangle)//define a pulse function
{
pulsewidth=(myangle*11)+500;//translate angle to a pulse width value between 500-2480
digitalWrite(servopin,HIGH);//pull the interface signal level to high
delayMicroseconds(pulsewidth);//delay in microseconds
digitalWrite(servopin,LOW);//pull the interface signal level to low
delay(20-pulsewidth/1000);
}
void setup()
{
pinMode(servopin,OUTPUT);//set the interface pin as output
Serial.begin(9600);//
Serial.println("servu=o_seral_simple ready" ) ;
}
void loop()//translate the number 0-9 to angle between 0 degree to 180 degree, and let LED blink the same times
{
val=Serial.read();//
if(val>Ɔ'&&val<=Ə')
{
val=val-Ɔ';//
val=val*(180/9);//translate number to angle
Serial.print("moving servo to ");
Serial.print(val,DEC);
Serial.println();
for(int i=0;i<=50;i++)//wait enough time so that the servo can rotate to the specified angle
{
servopulse(servopin,val);//call the pulse function
}
}
}


